Classic Peanut Butter Blossoms
Before opening your pantry, check your peanut butter jar. Using standard commercial creamy peanut butter—not natural stir-style peanut butter—is the single decision that determines whether your cookies hold together or crumble apart when pressing the chocolate center. Commercial peanut butter provides stabilized fats that combine with butter to create a sturdy, tender dough. We rely on a short chilling step and precise oven timing so your cookies bake with soft centers, crackled sugar edges, and intact chocolate tops every time.
Why Soft Dough and Timing Control Every Blossom
The foundation of a classic blossom cookie relies on managing fat stability and dough temperature. Commercial peanut butter contains hydrogenated vegetable oils that prevent fat separation during mixing and baking. When combined with softened unsalted butter and brown sugar, these fats create a dense structure that retains moisture while baking. Natural peanut butter releases free oil when heated, breaking the dough matrix and leading to greasy, crumbly edges that split when pressed.
Chilling the dough for 30 minutes before shaping is equally critical. Solidifying the fats slows down dough spread when the baking sheet hits the 375°F oven. Slowing the spread keeps the center thick enough to support the chocolate kiss. If the dough is warm when entering the oven, the cookies spread flat, leaving no cushion to hold the chocolate.
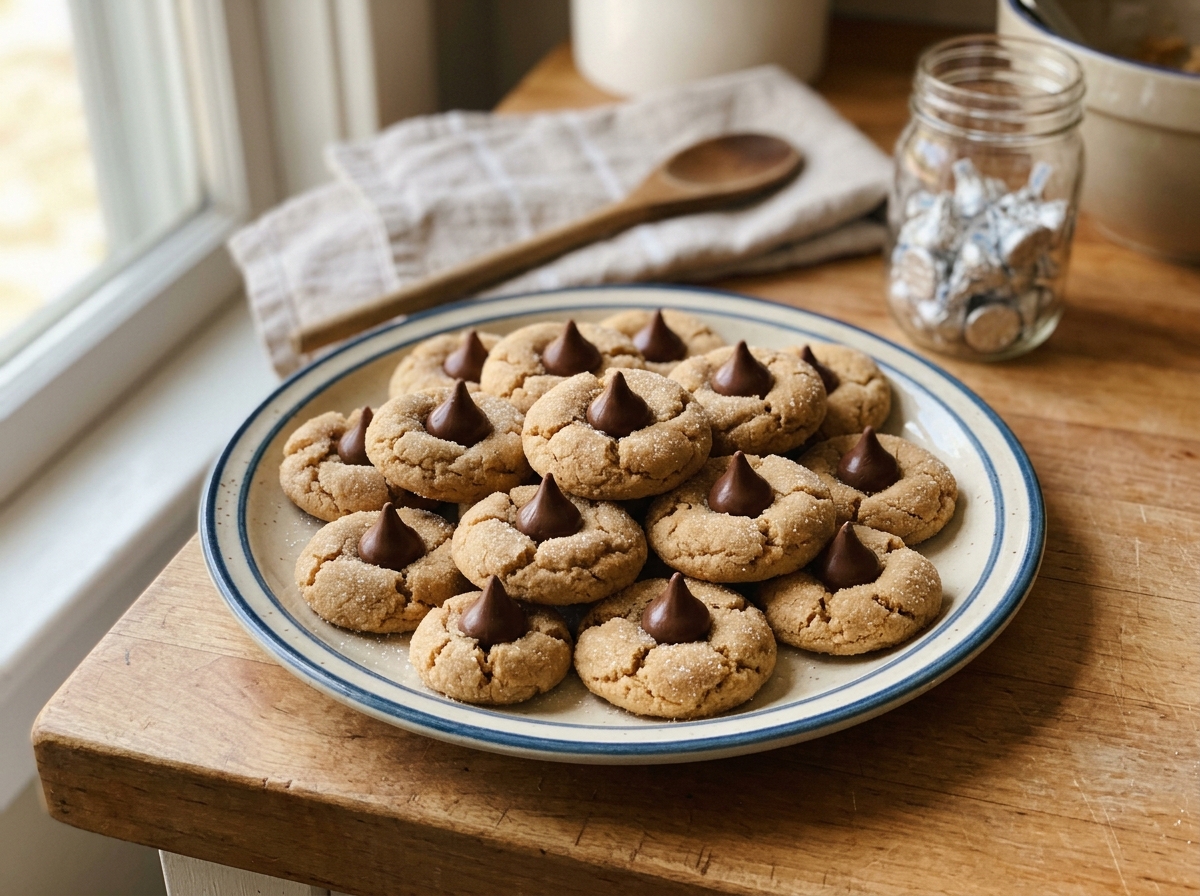
Timing the chocolate press leverages carryover heat to anchor the candy without liquefying it. Pressing an unwrapped chocolate kiss into the warm cookie immediately after removing the tray from the oven allows residual heat to soften only the bottom disc of the chocolate. This slight melt fuses the candy to the cookie base while preserving the cone shape of the kiss as it cools.
Essential Ingredients for the Perfect Peanut Butter Base
Selecting the right ingredients ensures consistent dough structure, proper spread, and balanced sweetness across every batch.
- Creamy Commercial Peanut Butter: Standard shelf-stable peanut butter provides emulsified fat and distinct peanut flavor without excess oil separation. Crunchy commercial peanut butter works as a substitute, though dough balls will have a bumpier surface. Avoid natural jarred peanut butter that requires stirring.
- Unsalted Butter: Softened to 65°F, butter creams with sugars to trap tiny air pockets for a tender crumb. If substituting salted butter, reduce added salt by half to prevent over-salting.
- Granulated and Light Brown Sugar: Light brown sugar provides moisture and chewiness through molasses, while granulated sugar adds crisp structure. The extra granulated sugar reserved for rolling creates the signature crackled exterior. Dark brown sugar can replace light brown sugar for a deeper caramel note.
- Milk Chocolate Kisses: Classic milk chocolate kisses soften just enough on the warm cookie base to adhere securely. Unwrapped mini peanut butter cups make an excellent alternative for extra peanut flavor.
- All-Purpose Flour: Standard all-purpose flour provides structure without making the cookie tough. A 1:1 gluten-free baking flour blend containing xanthan gum works with minimal change in spread.
Visual Cues for Baking and Pressing the Chocolates
Relying solely on a timer can result in dry or underbaked cookies. Watch for specific visual and physical cues during prep and baking to hit the ideal texture.
- Creaming the Base: Beat softened butter, peanut butter, brown sugar, and granulated sugar together for 2 minutes on medium speed. The mixture should lighten from dark tan to a pale beige color with a smooth, fluffy texture.
- Shaping and Coating: Portion chilled dough into 1-inch balls weighing roughly 22 grams each. Roll each ball between your palms until smooth, then drop into granulated sugar. Coat thoroughly until no raw dough shines through.
- Recognizing Oven Doneness: Bake at 375°F for 8 to 10 minutes. Look for puffed tops, set outer edges, and fine cracks forming on the surface. The center should look soft and slightly underdone. Do not wait for tops to turn dark brown, or the cookies will dry out once cool.
- Pressing the Chocolates: Set the hot baking sheet on a heat-safe surface and immediately press an unwrapped chocolate kiss into the center of each cookie within 60 seconds. You should feel the cookie yield smoothly while fine cracks widen around the candy base.
- Cooling and Setting: Allow cookies to rest on the baking sheet for 3 minutes. Transfer cookies carefully to a wire cooling rack. Leave them undisturbed at room temperature for 2 hours until the softened chocolate firms up entirely.
Pitfalls That Ruin Texture and Shape
Avoid four common mistakes to guarantee clean, well-shaped results every batch.
- Using Stir-Style Natural Peanut Butter: Natural peanut butter lacks the emulsifiers needed to bind flour and fat. The separated oil causes dough to crumble during rolling and crack excessively when pressed, yielding dry cookies. Stick to conventional commercial brands.
- Moving Cookies While Chocolate is Warm: Heat from the freshly baked cookie softens the inner core of the chocolate kiss for up to an hour. Touching or moving cookies too soon will crush the point or smear melted chocolate over the sugar crust. Let them cool fully on a rack until the chocolate is solid to the touch.
- Overbaking the Dough Base: Peanut butter dough dries out rapidly if left in the oven too long because of its high protein content. If edges turn dark brown, cookies become hard and chalky once cooled. Remove the baking sheet when edges are set and centers remain pale.
- Baking Warm Dough: Skipping the 30-minute refrigeration step allows butter and peanut oil to melt too quickly in the oven. Warm dough spreads into thin discs, causing the chocolate kiss to sink straight through the center or topple over sideways.
Simple Swaps for Seasonal and Flavor Variations
You can easily tailor this base recipe for holidays or distinct flavor combinations while keeping the core dough ratio intact.
- Mini Peanut Butter Cup Blossoms: Swap chocolate kisses for unwrapped miniature peanut butter cups. Press them bottom-side down into hot cookies right out of the oven for double the peanut flavor.
- Dark Chocolate Sea Salt Blossoms: Roll dough balls in coarse sparkling sugar instead of refined white sugar. Top with dark chocolate kisses out of the oven, then sprinkle a light pinch of flaky sea salt over each chocolate point.
- Holiday Color Blossoms: Substitute red, green, or pastel sanding sugars for the rolling sugar. Top with striped peppermint kisses or dark chocolate kisses for festive platters.
Freezing Dough and Stacking Finished Cookies
Proper storage methods preserve the soft texture of the cookie and protect the chocolate tops from damage.
Room Temperature Storage: Store completely cooled cookies in a sealed container at room temperature for up to 5 days. Place parchment paper between layers to prevent chocolate tips from marking cookies above them. Keep containers away from heat sources so chocolate remains solid.
Freezing Baked Cookies: Arrange fully cooled cookies on a baking sheet in a single layer and freeze for 1 hour until chocolate is rock-hard. Transfer frozen cookies into a rigid container separated by parchment paper sheets. Freeze for up to 3 months. Thaw uncovered on the counter for 30 minutes before serving.
Make-Ahead Freezing for Raw Dough: Scoop and roll dough into 1-inch balls without coating in sugar. Freeze raw dough balls on a parchment-lined sheet for 2 hours, then transfer to a freezer bag for up to 3 months. When ready to bake, thaw dough balls on the counter for 15 minutes, roll thoroughly in granulated sugar, and bake at 375°F for 10 to 11 minutes.
Frequently Asked Questions
Why did my cookies crack excessively when I pressed the chocolate kiss inside?
Excessive cracking happens when the dough is too dry or has cooled down too much before pressing. If you use natural stir-style peanut butter or add too much flour, the dough loses flexibility. Spoon and level your flour, use commercial peanut butter, and press unwrapped chocolates within one minute of pulling the pan from the oven.
Can I make the dough ahead of time and bake it later?
Yes, peanut butter blossom dough keeps well in the refrigerator for up to 48 hours. Wrap the dough tightly in plastic wrap to prevent drying. Let the chilled dough sit on the counter for 10 to 15 minutes before shaping so it rolls smoothly into balls.
Why did my chocolate kisses melt into liquid puddles on top of the cookies?
Chocolates melt into puddles if pressed while cookies are still in the oven or if placed back in the oven after pressing. Always press kisses into cookies AFTER pulling the pan from the oven. Let the baking sheet sit away from stove heat so residual heat softens only the bottom disc of the candy.
Can I use crunchy peanut butter instead of creamy?
Yes, regular commercial crunchy peanut butter works in a direct 1:1 ratio. The peanut bits add a pleasant texture contrast throughout the cookie base. Note that dough balls will have a slightly bumpier surface when rolled in sugar.
Classic Peanut Butter Blossoms
Ingredients
Equipment
Method
- In a large bowl using an electric mixer or in the bowl of a stand mixer fitted with the paddle attachment, beat the softened unsalted butter, creamy peanut butter, 1/3 cup granulated sugar, and 1/3 cup packed light brown sugar together on medium speed for 2 minutes until smooth and pale beige.
- Add the egg, whole milk, and pure vanilla extract to the butter mixture, beating on medium speed for 1 minute until fully incorporated.
- In a separate bowl, whisk together the all-purpose flour, baking soda, and fine salt.
- Add the flour mixture to the wet ingredients and mix on low speed just until a soft dough forms and no dry streaks remain.
- Cover the bowl tightly with plastic wrap and refrigerate the dough for 30 minutes to firm up the fats.
- Preheat your oven to 375°F (190°C) and line two large baking sheets with parchment paper.
- Place the remaining 1/3 cup granulated sugar in a small, shallow bowl.
- Scoop tablespoon-sized portions of chilled dough (about 22 grams each) and roll them between your palms into smooth 1-inch balls.
- Roll each dough ball in the granulated sugar until completely coated, then place them on the lined baking sheets spaced 2 inches apart.
- Bake one sheet at a time at 375°F (190°C) for 8 to 10 minutes, until the cookie tops are puffed and edges are set with fine surface cracks.
- Remove the baking sheet from the oven and immediately press one unwrapped milk chocolate kiss firmly into the center of each hot cookie within 60 seconds.
- Allow the cookies to rest on the hot baking sheet for 3 minutes, then carefully transfer them to a wire cooling rack to cool completely for 2 hours until the chocolate resets.